QR codes have become an integral part of our modern digital lives, offering a convenient way to share information and facilitate various transactions. In this blog, we will explore how to generate and display QR codes in a Flutter application using the barcode package. We will focus on a practical example of generating a UPI payment QR code and displaying it on the screen.
Creating UPI Payment QR Code Generator in Flutter


Vaishnavi Ambidi


July 04, 2023
Creating UPI Payment QR Code Generator in Flutter
UPI payment is a widely used feature in most applications. In this blog, we will show how to create such functionality in Flutter using three essential packages.
To create this functionality, you only require three things:
- A UPI ID and the amount you want to transfer.
- A package to generate a QR code - we will be using the "barcode" package.
- A package to render the QR code generated - we will be using the "flutter_svg" package (optional).
Setup
To get started, add the barcode and flutter_svg packages to your pubspec.yaml file under the dependencies section:
barcode: ^2.2.3
flutter_svg: ^1.0.3
Save the file and run 'flutter pub get' to install the packages.
Building data for QR code
Each UPI QR Code contains a url that encodes various required data points. The URL is of the following format:
upi://pay?pa=${UPIId}&pn=${payeeName}&am=${transactionAmount}&tn=Payment Message/note&cu=INR
Let’s look at each field in the URL.
- pa-Payee address or business virtual payment address (VPA).
- pn - Payee name or business name.
- am- Transaction amount. (Up to two decimal digits are allowed. This should be set in the details object instead of the supportedInstruments object.)
- cu -Currency code. (This should be set in the details object instead of the supportedInstruments object. Only the Indian rupee (INR) is currently supported.)
- tn - Transaction note. It is the description appearing in the Google Pay payflow. (Maximum length is 80 characters).
Now, let's take a look at the function we can use to generate UPI format data for the QR code:
String generateUpiQRData({
  required String upiId,
  required String payeeName,
  required int amount,
  String currencyCode = "INR",
  String transactionNote = "",
}) {
  return "upi://pay?pa=$upiId&pn=$payeeName&am=$amount&tn=$transactionNote&cu=$currencyCode";
}
By utilizing the generateUpiQRData function, you can easily construct the UPI URL by providing the necessary parameters such as the UPI ID, payee name, transaction amount, currency code (with default as INR), and an optional transaction note.
Generating QR Code
To generate a QR code using the data returned from the previous function and the barcode library, we’ve created the following method.
Future _loadBarcode() async {
 isLoading = true;
 setState(() {});

 String upiDetails = generateUpiQRData(
   upiId: widget.upiID,
   payeeName: widget.payeeName,
   amount: 1,
   transactionNote: "Test Payment",
   currencyCode: "INR",
 );

 barcodeData = await _getQrcodeData(Barcode.qrCode(), upiDetails);

 isLoading = false;
 setState(() {});
}
In the _loadBarcode() method, we set the isLoading flag to true and update the state to reflect the change. Then, we generate the upiDetails string using the generateUpiQRData() function, which creates the UPI format data. Next, we pass this string along with Barcode.qrCode() from the barcode package to the _getQrCodeData() method to generate the QR code data.
By calling Barcode.qrCode(), we indicate that we want to generate a QR code specifically. This function returns an instance of the Barcode class with the QR code type specified. Finally, we set the isLoading flag to false and update the state again.
Displaying the QR Code
To display the generated QR code, we’ve created the following method.
  String _getQrcodeData(Barcode qrcode, String data) {
    return qrcode.toSvg(
      data,
      width: MediaQuery.of(context).size.width * 0.7,
      height: MediaQuery.of(context).size.width * 0.7,
    );
  }
The _getQrcodeData() method takes two inputs: the QR code provided by the Barcode package and a String representing the data to be encoded. This method utilizes the toSvg() method from the Barcode package to convert the data into an SVG string representation of the QR code. Additionally, the method dynamically sets the width and height of the SVG based on the device's screen size.
To actually display the QR code, we used the SvgPicture.string() widget. This widget allows you to pass the generated SVG data as a string parameter. Here's an example of how you can implement it:
SvgPicture.string(
  barcodeData,
  height: 200,
  width: 200,
),
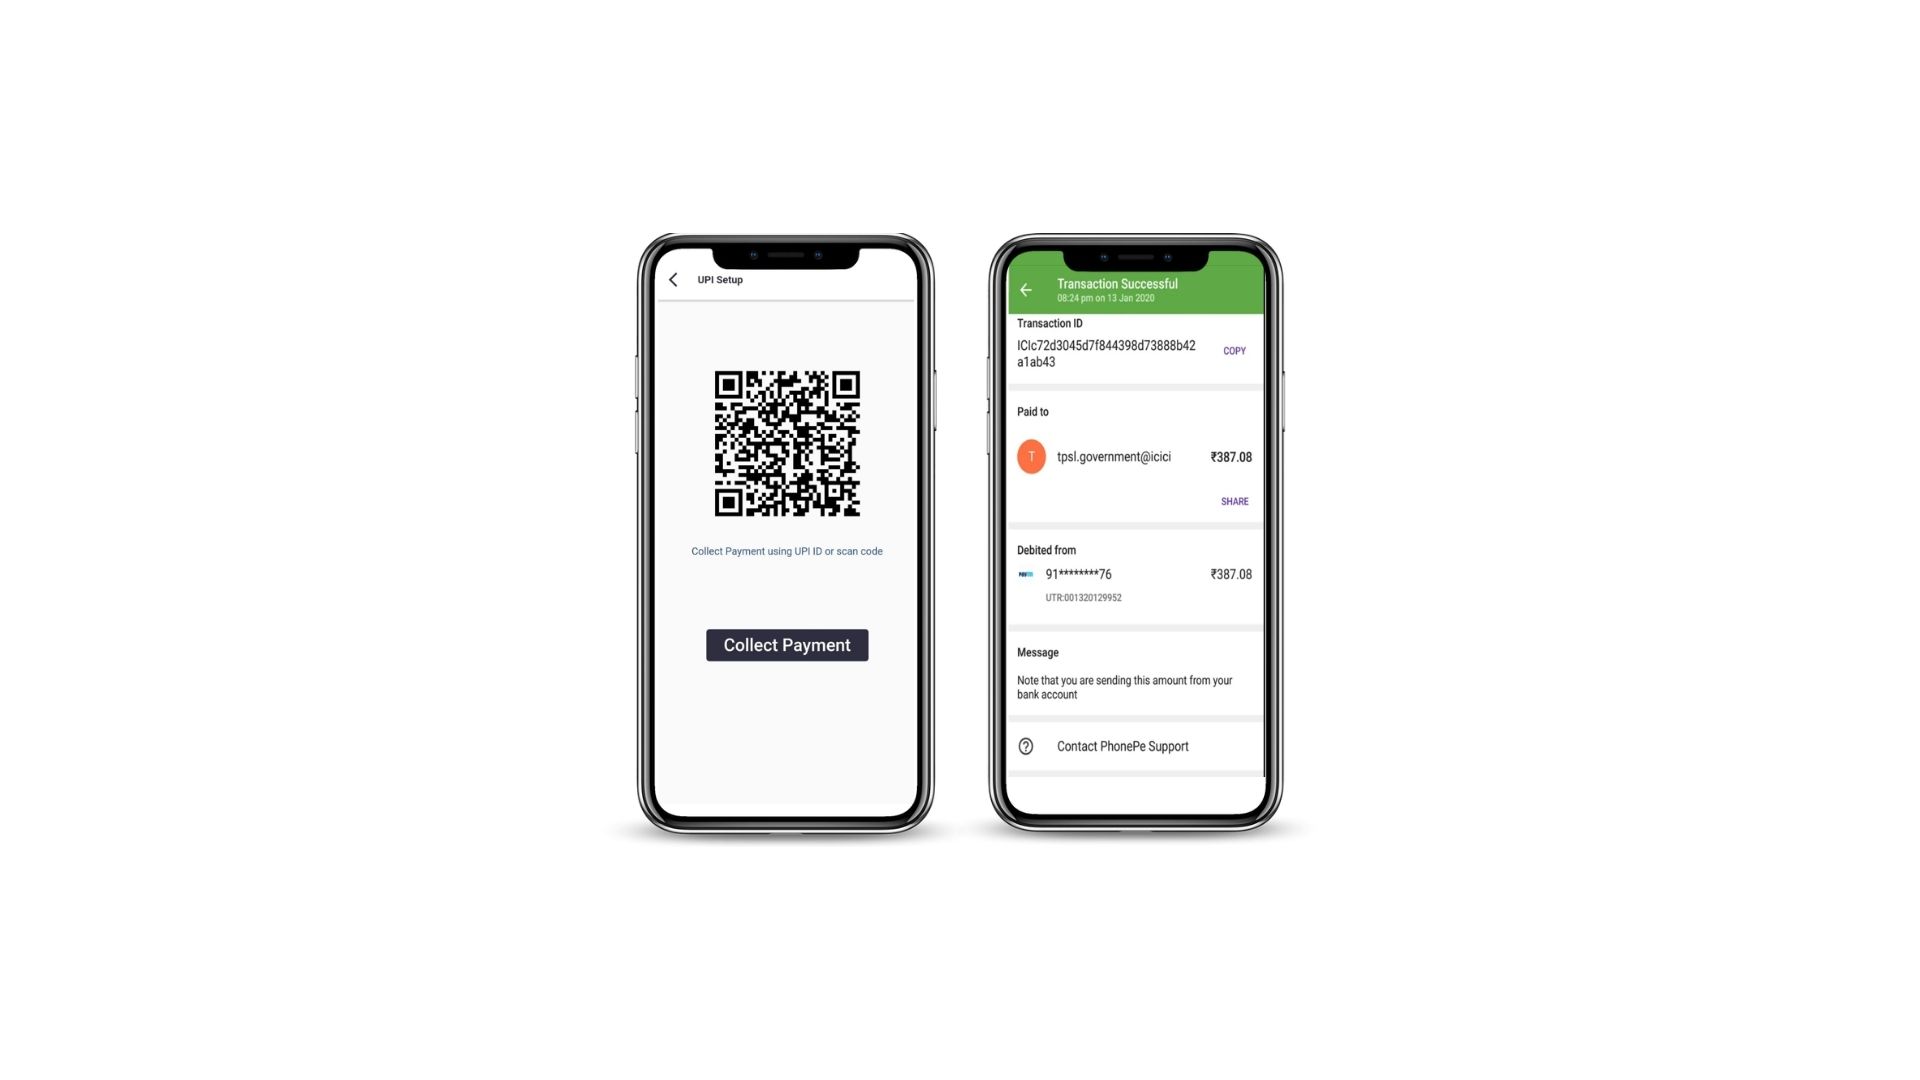
And as a result, you will see the following output!!!
Complete example
This complete example should now use the indvidual functions that we created above.
Example:


import 'package:flutter/material.dart';
import 'package:flutter_svg/flutter_svg.dart';
import 'package:barcode/barcode.dart';
import '../core/presentation/theme/colors/colors.dart';


class ScanQRCode extends StatefulWidget {
  const ScanQRCode({super.key, required this.upiID, required this.payeeName});
  final String upiID;
  final String payeeName;
  @override
  State<ScanQRCode> createState() => _ScanQRCodeState();
}


class _ScanQRCodeState extends State<ScanQRCode> {
  @override
  void initState() {
    super.initState();
    Future.delayed(Duration.zero, () {
      _loadBarcode();
    });
  }


  bool isLoading = true;
  String? barcodeData;


  Future _loadBarcode() async {
    isLoading = true;
    setState(() {});
    String upiDetails =     "upi://pay?pa=${widget.upiID}&pn=${widget.payeeName}&am=1&tn=Test Payment&cu=INR";
    barcodeData = _getBarcodeData(Barcode.qrCode(), upiDetails);
    isLoading = false;
    setState(() {});
  }


  String _getBarcodeData(Barcode bc, String data) {
    return bc.toSvg(
      data,
      width: MediaQuery.of(context).size.width * 0.7,
      height: MediaQuery.of(context).size.width * 0.7,
    );
  }


  @override
  Widget build(BuildContext context) {
    return Scaffold(
      appBar: appBar(context, 'UPI Setup'),
      body: isLoading
          ? Center(
              child: const CircularProgressIndicator(),
            )
          : Center(
              child: Column(
                crossAxisAlignment: CrossAxisAlignment.center,
                children: [
                  Spacer(flex: 1),
                  SvgPicture.string(
                    '''$barcodeData''',
                    height: 200,
                    width: 200,
                  ),
                  SizedBox(height: 40),
                  Text(
                    'Scan the QR code',
                    style: TextStyle(color: blueContainerColor),
                  ),
                  Spacer(flex: 1),
                  ElevatedButtonWidget(
                    text: 'Collect Payment',
                    onPressed: () {},
                  ),
                  Spacer(flex: 2),
                ],
              ),
            ),
    );
  }
}
That's it! You now have a Flutter app that can generate a QR code with UPI data using the Barcode package. You can customize the UPI data and QR code size as per your requirements.
Now, it's time to put your newfound knowledge to practice and explore the endless possibilities of QR code integration in your Flutter projects. Happy coding!